Thursday, October 26, 2006

author's choice

I figured I'd write an entry on some of the programs and materials that I use and work with. Much of my free time lately has been spent in music composition. If you'd like to hear some of my work, please feel free to visit my (in development) site, Aside Michelle.

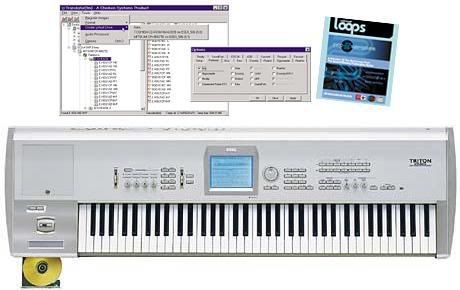
When I'm not at home near my electric baby grand (the decision to go electric has been regretted, although this instrument was a surprise), I keep my Korg Triton Pro keyboard with me. This baby was my car in high school, and I've been using it to record songs since my Sophomore year. Although the keys are not full in length, weight, or size, it gets the job done and offers an astounding variety of bells and whistles, all at the touch of your fingers, quite literally. With touchscreen navigation and easy track-over-track synthesizing and recording, you can have up to 32 hands playing one song at the same time. It's been quite a dream, and I'm still learning some of the functions on my Korg.


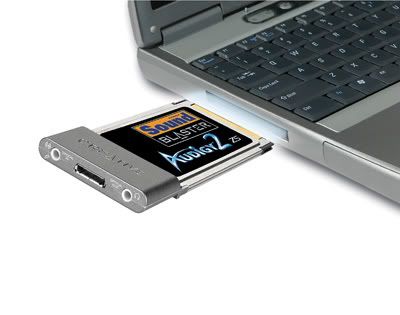
Christmas can't come soon enough, as I've also added the Audigy Soundblaster card to my wishlist! This soundcard hooks directly up to your laptop (or desktop, depending on which you buy), and allows you to record directly onto your harddrive. No more midi! Good quality, good choice! I highly recommend looking into this if it interests you.


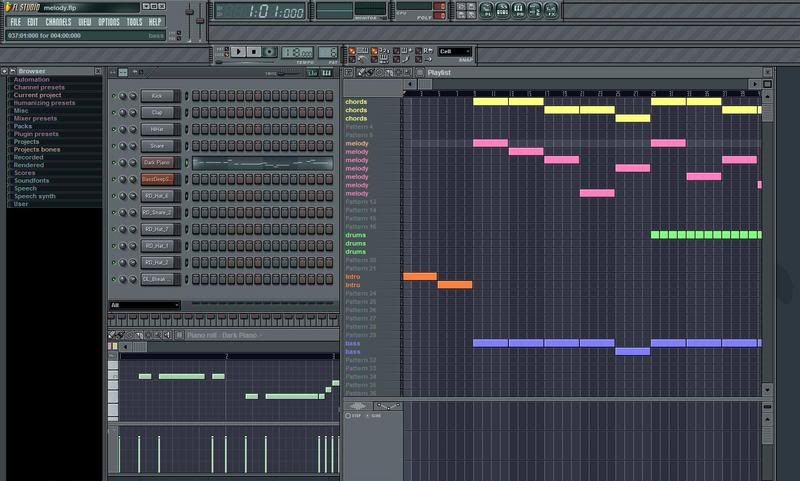
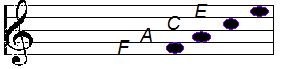
Last but not least, my composition software of choice is Fruity Loops. This program requires absolutely no knowledge of music theory, and works very similarly to coloring graph paper! Basically, this allows you to create patterns and piece them together in order to create your song. Offering plenty of quality tracks and sounds, this software has been my favorite, hands-down. Here is a screenshot taken from one of my songs.


There you have it! Although you may not have professional equiptment, you can still create a masterpiece with a basic soundcard and program. Most importantly, just remember to have fun!


Wednesday, October 18, 2006

Treble clef


Ever seen one of these before?


This is called a Treble Clef. For our purposes, all you need to know for now is that the "Treble" (not to be confused with "trouble") Clef means your RIGHT hand.


Not too hard so far, right? So we've got Treble Clef, RIGHT hand.
No problem.


Here is our next piece!


This here is called a staff. It consists of 5 LINES, and 4 SPACES. See?


Now if we put all of this together, we'll be ready to get started!
Let's see what this looks like.


Not too frightening anymore, is it? Now that we're familiar with all
of the elements here within the staff, let's look
at some of the actual notes!


Let's look at the lines first. Have no fear! There is a trick to learning these.
From bottom to top, the lines are named the following:


The trick to remembering this is to create an acronym. I've always used:
"Ernie Gave Bert Dead Fish"... or

"Every Good Boy Does Fine"

Either will work, whichever helps you remember!


Got it yet? Ready to move on?
Now let's look at the Spaces! You might find this one easier to remember.
Why's that? Let's take a look!


I used to tell my younger piano students that
this was called the "SPACE FACE".
That usually brought up images of aliens with big helmets, and worked well.
Either way, it shouldn't be too hard to remember!


That's it for now! We'll dive into some actual staff reading next time!
Keep up with your scales!


Methods

There are several methods of learning piano. Some people claim that one is better than the other, but in my personal opinion, no matter which way you learn, you can be guaranteed to learn faster if you expose yourself to more than just one dimension of the piano. We've talked about this before, but I really want to emphasize the importance of learing piano from as many angles as possible. The deeper you dive, the better the swim!

Let's talk about some of these methods before we actually get into one. Up until now, we have been focusing on the chord aspect of music. I belive this to be a good way to get into the music, as you can go out and look for music that you like, find the chords in a book or on the internet, and learn it. This is a great way to start, as you are drawn in through your own motivations and interests.

There is a method that you may be familiar with called the Suzuki method. This method was created by a Japanese pianist by the name of Dr. Shin'ichi Suzuki. His method was based off the observation of how quickly children can pick up language when they are young. He reasoned that, if children could master a mother tongue, they could also master the language of music. There are some key elements that were used for this style of learning.

1.) Music was absorbed in a natural, musical environment. Attending concerts, avoiding musical "auditions" or exams, and just exposing yourself to music for natural saturation was one of the big elements in this style.

2.) Learning to hear music and play by ear was taught before reading from a staff or any sort of musical notation. This was based on the principle of how children learn to speak before they read. A strong emphasis was placed on memorization of the music being played.

3.) Group playing was also encouraged, as opposed to solo practice.

4.) Public performances were also a strong element, as Dr. Suzuki believed that retention and review of songs, both new and old, was extremely important.

For more information on the Suzuki method, feel free to check Wikipedia's entry here.

Up until now, our method has been closely related to the Suzuki method. However, this is where I will introduce the staff reading portion of our lessons. I believe holding a balance between staff notation and Suzuki is important, just as it is important to balance your exposure to music in many different dimensions, not just one.

In the following lessons, we will be studying musical notation. Don't panic! This is nothing you can't do. If you keep practicing your scale, and you're able to close your eyes with your hand in a scale position, and play an E or a G without looking down at your fingers, this will be a breeze!

If not, don't sweat it! These following sections will only help reinforce this. If you find yourself frustrated or having difficulties in learning, take a break, work on your scale, listen to some music, or look up the chords to another song and play. You can practice the piano in many ways! Just stick to it, and you'll get the hang of it!

Monday, October 16, 2006

Scales: Listen to

For further reference when it comes to playing a scale, I have found some resources that will offer additional help in the technique of playing a scale.

1.) Audio Demonstration: This will give you a good idea of what a typical C scale sounds like. (Requires Quick Time)

2.) Wikipedia: Naturally, wikipedia offers more in depth studies of the C scale, including the notation, which will allow you to see what a scale looks like on a staff.

3.) Scale Demonstration: This site will provide a demonstration for any scale that you choose. This is a fun way to be interactive, listen, and play around with different sounding scales. It will also give you a good idea of what to expect in the future when dealing with major and minor scales.

4.) Further Intsruction: In case my guide to the C major scale was not sufficient enough, this site offers another approach to learning. Feel free to study this as in depth or as little as you wish.


Don't forget! The more you get involved, the faster you'll learn. Don't just play a song. Find something visual AND audio. Read AND listen. With this in mind, you can't go wrong!

Thursday, October 12, 2006

Scales: What to

How is your scale coming along? Hopefully you're getting it down pretty quickly! In order to push towards a more effective practice, I've come up with a list of things to consider when practicing your scale.

1.) Relax your hand. If you find yourself feeling tension or strain in your hand, chances are you aren't relaxed. Roll your shoulders, open your hand, and be aware of the muscles in your hand and arm when you sit down in front of the keyboard. Try to stay loose, and if you feel yourself tensing up-- stop, take a break, and then start again.


2.) Go slow. The more time you can give yourself to think, the better. It's not a race to the end! It's about building discipline. I know this can often seem boring, playing a simple scale, but focus on each note as you play it. Pretend someone you care about is sitting next to you as you play, and your job is to make that scale as pure as you can. This is the goal!

3.) Keep a consistant beat when practicing your scale. If you rush from C to E, then pause to tuck your thumb under to F, you need to slow down. Give yourself some time to plan ahead. Speed will come. It's better to be slow and consistant than fast and rushed.

4.) Play only one note at a time. The moment you press the next key, the previous one should be released, like a see-saw. You want the notes to connect, but you don't want too much overlap. Think "pure"!


Many of these tips are similar to the overall exercise techniques, and can be applied to many different areas of piano practice. I once a heard a story from a colleague of mine that stuck in my mind as an ideal accomplishment for a scale. My colleague was sitting in a practice room in front of his piano, and he was about to start playing when he heard someone playing in the room next to him. He waited a moment to listen and heard and a simple C scale coming from the room next door. Although it was just a C scale, he then described that through the purity of sound, the attention to detail, and the consistency of the player, that scale was one of the most beautiful sounds he had ever heard.

Keep this in mind when you're practicing! Although it is just a scale, there is a great deal of beauty in purity.

Scales: How To

What comes to mind when you think of "scale"? Would it be something on the lines of weight measurement?


http://wubby.typepad.com/photos/development_art/scale.jpg


Maybe you picture something more on the lines of...


http://pinker.wjh.harvard.edu/photos/santa_barbara_california/images/lizard.jpg


Certainly something like this might not come to mind, would it?


http://research.yale.edu/ysm/images/77.4/articles-music-figure1.jpg


If it does, then you're ahead of the gang! What exactly is this third picture? We know now that it is a scale, but what exactly does that mean? For our purposes, a scale is a range of tones starting on one note and ending on that same note. The picture above would be a C scale. The start and end notes are both C, and each of the notes in between are the steps taken to get between each C.

What's the big deal? Why is this important? There is a great deal of music theory to support the importance and structure that a scale provides in music, however we're going to look at the C scale for our hand exercises.

So to start our C scale, start as if you were about to do a finger exercise. Using your RIGHT hand, take your 1 finger (your thumb) and place it on C. The goal when playing a scale is get from the first C to the next in a consistant and efficient way without any pauses or breaks. Basically, this means that if your audience could not see your hand, they might think you had 8 fingers and you were playing one night at a time, from C to C, without any effort.

Unfortunately, we do not have 8 fingers to do this, so we have to use a trick. Here's the secret!

Play C with your 1 finger (thumb)
Then play D with your 2 finger
Follow with E on your 3 finger

-- now here's the trick! --

Instead of playing F with your 4 finger, you're going to tuck your thumb under and play F with your 1 finger. Now, our hand can reach the final note!

So here's the sequence visually, to give you an idea.


finger 1 - C
finger 2 - D
finger 3 - E

then, you will want to tuck your thumb underneath onto F.


Now just play out the rest of your hand.

finger 1 on F
finger 2 on G
finger 3 on A
finger 4 on B
finger 5 on C


And that is how you play a scale! Give it a try, see if you get the hang of it, and tune in next time for some tips to consider when playing scales.

Tuesday, October 10, 2006

Hands

Hand positioning and knowing how to feel your way across the keys is something that you will want to develop as quickly as possible. When you start getting into written music, reading off of the read, you will find it much easier to play if you have a good idea of where your hands are. This will allow you to read the music on the page as opposed to having to look down at your hands to find the notes. There is a good solution to this. If we know our fingers by a number, and if we dedicate each finger to a key, then you will be able work the piano like you might a typewriter or computer keyboard. Every now and then you may need to glance down at your hands, but for the most part, you'll be able to focus on the page in front of you.

Let's look at the numberings on our hands that we use. Please note that these finger numbers are used for the piano primarily. Other instruments, such as guitar, may have a different system.


*((Note: this image will be available under the music reference column as "hands"))*


If you hold your hands out straight in front of you, you will see a mirrored image of fingers and numbers. This is the concept of how to play. When your right hand moves up the right side of the piano, you might want to think about a mirror and how your left hand should look as it moves down the left side. Keep this in mind for future reference.

So let's revisit those exercises I mentioned in the previous lesson. If you place your Right Hand on the keyboard, here is where your fingers will start.

1 finger on C
2 finger on D
3 finger on E
4 finger on F
5 finger on G


Practice moving from C to G, using only the designated finger for its own key. It's best to practice this every time you sit down at the piano so that you can put some strength into your fingers. Play from C to G, then back down G to C. Repeat this with your left hand.

These are both great ways to learn how to feel your way across the keys, and will be a tremendous help later on when tackling the aspect of reading music! Trust me on this! Learn and practice this now, and everything else will be much easier in the future.


Tuesday, October 03, 2006

Finger Exercises

Like anything else, exercising your fingers will help break the stiffness and build dexterity. When you sit down at your keyboard, you will want to warm up with a finger exercise. Here are some general tips for how your exercie should be:

  • Warm up for 5 to 10 minutes
  • Start with one hand at a time
  • Go slow, try and focus on each key as you play
  • Think about control, the idea is to discipline and control each finger


As for what to do when you're warming up, I've created some exercises that you may want to consider. Just make sure to refer to the exercise tips I've posted in order to get the most out of your warm-up!

Exercise #1: Using your Right hand, start with your thumb at C. Play from C to G, making sure only one key is pressed down at any time, and then play back down to C slowly.

Exercise #2: Using your Left hand, start with you thumb at G. Play from G to C, making sure only one key is pressed down at any time, and then play back up to G slowly.

Exercise #3: Place both thumbs on the same C key. Play outward in each hand at the same time. Your Right hand will be playing C to G, and your Left will be playing C to F. Make sure only two keys are played at any time, and then play back up to the C where your thumbs are.

These are just some basic ideas. What you want to do is get into the habit of giving each finger a respective key to play. The first songs you'll learn on the piano when you're reading sheet music will normally give each key one finger without any movement. As you become more and more advanced, you'll have to lift your hand to reach more keys.

For now, it is important to get some life and control in those fingers! When you've got those exercises down, we'll talk about scales!

And remember: Practice doesn't make perfect. Perfect practice makes perfect!